10 Simple steps to successfully building your project
Thermly Hub is an accessible, cloud-based platform that has been designed to allow the user to design a domestic retrofit project quickly and easily – and quantify the financial, energy saving, carbon saving and employment impacts.
What was previously a 2 or 3 month job – identifying, downloading, cleaning and structuring underlying datasets and then building Excel based modelling – can now be done in a matter of minutes. With significantly less scope for error.
And it’s all laid out for the user in 10 simple steps, working through the platform from top to bottom after login, with pop up instructions at every stage to guide inputs.
Building a retrofit project plan
In this guide, we will go through the following steps:- Step 1 - Enter project details
- Step 2 - Select targeted property characteristics
- Step 3 - Select targeted retrofit measures
- Step 4 - Define project geography
- Step 5 - Select targeted postcodes
- Step 6 - Set expected resident uptake
- Step 7 - Set extra costs and funding sources
- Steps 8 to 10 - Analyse timeline
Step 1 - Enter project details
Give your project a name, identify the lead organisation, choose to either build your project top down (‘Select All’ - all measures and geographies selected) or bottom up (‘Custom selection’), and choose whether to apply a custom selection of retrofit measures or calculate a best fit whole house to EPC C set of measures.
Step 2 - Select targeted property characteristics
Select and filter the targeted property types to be in the project population – identifying any mix of properties across on / off gas, EPC rating, property type or tenure type. Then press ‘apply filters’ to process the selected filters.
Step 3 - Select targeted retrofit measures
Select one or more retrofit measure to model (unless ‘whole house to C’ has been selected in Step 1, in which case this choice is automatically disabled).
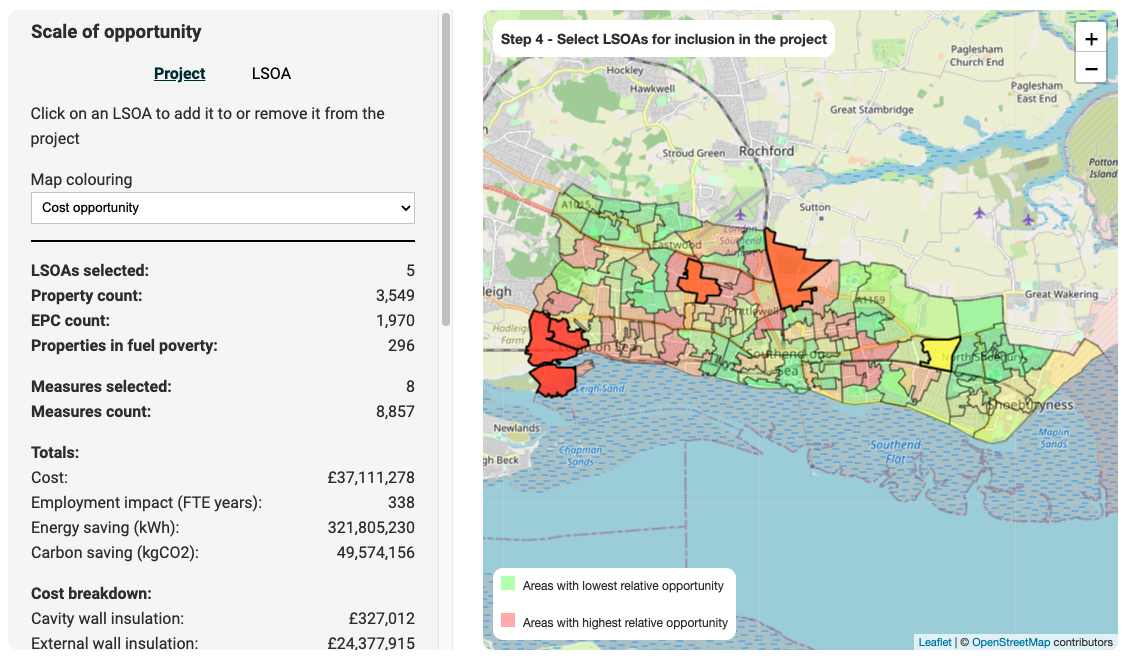
Step 4 - Define project geography
Apply a geographical filter on top of the property type and measure selections adopted in Steps 1 – 3. The user can first select the project priority - e.g. maximise energy saving or carbon reduction – and is then guided by the colour coded mapping visualisation towards the (LSOA level) areas of greatest potential. LSOAs can then be selected or deselected directly on the map – with all potential measures and associated impacts instantly calculated and presented in the side bar.
Step 5 - Select targeted postcodes
Filter further geographically down to individual postcode level within selected LSOAs, using the dynamic table – downloading an Excel file for offline analysis and reporting as required.
Step 6 - Set expected resident uptake
Apply the slider to set the estimated % resident uptake of selected measures within the identified postcodes.
Step 7 - Set extra costs and funding sources
Apply the sliders and input boxes to incorporate project assumptions for all or any of auxiliary costs, management fee and contingency costs – plus a flexible breakdown of funding % across lead organisation, resident and other sources. A further project summary table is then generated, along with headline financial metrics – all downloadable in an Excel file.
Steps 8 to 10 - Analyse timeline
The user can finally (Step 8) set a project start and end date, (Step 9) define the basis of profiling project costs (linear or custom) and (Step 10) determine the X and Y axes and measure(s) to be viewed on the project timeline graph.
The project is then fully populated – with KPIs dynamically presented at the bottom of the screen. The project can be saved and revisited / edited by pressing the Save button and following the screen prompts.
Any further questions?
Licensed users who are encountering any difficulties with populating or editing their projects should get in touch directly at any point – just contact us on info@thermly.co.uk, or follow the link below to our contact form.